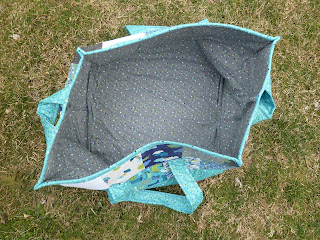
I started a quilt from Connecting Threads Soaked collection... (still wip-waiting for CLEAR open toe for quilting....) & bought some of their cordinating laminate & a layer cake pack to cut into charms. I had a bit extra fabric from the quilt kit, so i cut some 4.5" squares from that & cut some from the 10" pack. i could of just bought a charm pack, i guess, but i planned on about 2-3 of each. i overcut some, so i ended up with 3-4 of some & just 1 of a couple. Anyways, i had recently bought 'Fast & Furious: Family' by G.E. Designs (didn't realize she is from Iceland until i saw the cover!) & LOVED the Grab N' Go Carrying Tote (pg. 22) & had to make it!! It's a quilt as you go book, which i had never done. As i started cutting the material i realized how BIG this bag was!! yikes! But, that's okay, because i plan on leaving the quilt & bag in the trunk for day trips, etc.

At first, it was SO frustrating to work with!!!! it was so bulky & i have a cheapy lightweight Brother..... (i want to buy a new one... but have no idea how to shop the current selection!). i immediately tried all the suggestions for working with laminate....painters tape on the feed? (worthless!), tissue paper (how do you follow your line?? & it popped some of my stitches up too)... when in the end it was best to just increase the stitch length & sew normally & i had no problems. well, the biggest problem was marking my sewing line.... chalk didn't stick, marker wiped off.... desperate for a 'i-want-to-work-on-this-now' approach, i just used a ball-point pen.... i know... it's probably permanent, but it only shows a little if you inspect the bottom. i probably should have felt the edges from the lining side & flipped it over, huh? oh well. Once i was able to cut the extra fabric around, it was so much easier to work with. i'm a newbie in bag making, but i'm quickly going through some patterns. :) every pucker & whatnot was making me crazy. i'm not a perfectionist, but i think i am in my head, so every little thing was eating me!! it finished quickly enough & i love the side seam trick (i think i knew this once before, but forgot...?), but i love how it easily hides the edges!! once i had it together the imperfections aren't a big deal... they are lost on the inside & i'll use a little fray check on part of a side seam that didn't get caught in. I am SO happy with this project, i felt so accomplished all day after finishing it!!! can't wait to make another!! i threw it out in the living room & my toddlers climbed in!! ... it's THAT big! a bonus 'travel bed' for my littlest one!! :)
the modifications i made:
1. the handles, instead of using regular fabric as called for, i used laminate for that too... i figure all those dirty hands or scuffing the floor. now the handles can wipe clean too!!
2. i couldn't find the recommended interface/batting Bosal, so i substituted with Pellon 70. the package (multiple unopened at the store, verified by store clerk) all said width 22"... it was not. more like 19"... so i cut short the dimensions by 2".
(of course, this fabric ALL went on sale 40% off
about a week and a half after i bought it... as usual.)

